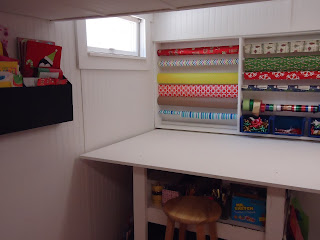
Wainscoting panels cover the walls and enclose the ceiling's ductwork, and bright white paint make this formerly horror film worthy room a nice escape for me. I hung my wrapping paper using tension rods so I can easily switch them out and replace when needed as well as raise and lower to accommodate more/fewer rolls of paper. The table underneath the wrapping paper has casters and can move around the room as needed and I have placed command hooks on the sides of the table to hang my gift bags on. A shelf underneath it holds several bins, drawers, and cup holders to store all of my crafting supplies.
And did I tell you I laid the laminate wood flooring? All. By. Myself. I've never felt more proud or accomplished but my knees were saying bad things about me all the while. During this project I learned to use a miter saw with skill, a finishing nailer with aplomb, and set up an air compressor with my own two little hands. I also know how to remove and add nails to the gun and where the release is on the miter saw blade so that I can use it. I gotta start somewhere I tell ya! Move over Amy Matthews from DIY network. I'm coming after your job with lip gloss in one hand and caulking in another.
So now I'm at the stage where I'm trying to refine my space. I'm living in it for a while and adding what I find I need. Which comes to the purpose of this post....I need an easy access storage spot for my small wrapping paper remnants, tissue paper, and shirt boxes. Armed with a mission I set out for Target, my favorite store in the whole universe, and perused several aisles for inspiration for storage solutions. I found several options however, per the name of this blog, I wanted to stay thrifty since I am adjusting to living off only one paycheck now. Finally I came across these puppies in the office organization section.
And felt like they would be perfect. See the holes on each corner of the backing? I made a pit stop at my local Dollar General and found these to attach my new organizers to my wall.
What can I say? They are cheap, pink, and they stick like nobody's business. So here's how my organizers look all done up! I have one for Christmas things (on the left) and one for everyday things (on the right).
And the blank spot in between the printer and my craft table (underneath the ductwork) looked like the perfect spot to put them.
So here's a couple of shots of them in their new home!
Next on my to do list in this room is to paint the top of the table a durable and more wipeable (is that even a word?) glossy grey color. After doing crafts with my two little nieces the very first day I used my table I quickly realized white just isn't going to cut it!


No comments:
Post a Comment